

During the last days my body demanded some rest and pain killers but somehow I still managed to make a nice progress concerning the keyhole neckline of my 12th century dress. 🙂
Fortunately the change of seasons doesn’t really affect me unless it is a major weather change. I only have to endure some food allergies, occasionally head aches/migraines and the monthly female burden so many of us have to deal with. And though the pain killers manage to calm down most of my pain and get me through the day, they make me unable to think and focus properly on more then just very basic tasks and projects.
Well, embroidery has never been a problem for me, even under the influence of strong pain killers. But working at the next part of the keyhole neckline involves a lot of measuring, pinning and cutting. And I knew I wouldn’t be capable to focus long enough to get the job properly done. Yes, the past definitely taught me to keep my fingers from anything that is more difficult than just placing some simple (embroidery) stitches while I am taking any kind of painkillers. *lol*
But there was still one very basic and rather easy step left which I had to complete before I could even think about starting with the next step for my keyhole neckline. And it just involved many tiny hand sewing stitches – something I have done so many times before and which felt easy enough for me to do.
Though many of you might think that this step is just extra work and not really necessary, I think that it is a very important step if you want a nice and “sharp” border. Yes, I know, I somehow get easily obsessed with small details like this but they really make a difference.

Above you can see the keyhole neckline border just pinned down to keep the fabric in place – this is as far as I got concerning my keyhole neckline last week. And at the picture underneath you can already see the great effect which can be achieved with just some simple small running stitches along the border of the neckline.

This small stitches keep the fabric in place and make the next step much easier – the measuring, pinning and cutting of the outer borders of the keyhole neckline. They create a “sharp” and solid border which doesn’t shift and reduce the amount of pins I have to deal with during the next step.
And I have again a close up picture of the keyhole neckline for you:
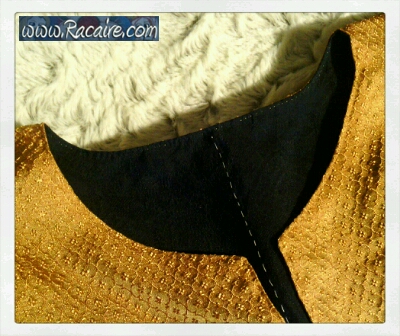
Yes, I know, the stitches are really very tiny, therefore I have one more close up picture for you to give you a better idea of what I have done during the last step:

As you can see on the picture above, I used a very thin sewing needle and some of my finest yellow silk thread for the running stitches around the border. Every one of the small yellow dots – which you can see along the border on the dark blue silk – is actually a small running stitch.
It really doesn’t need more than just this tiny stitches to connect all the layers of fabric along the border. They create a very nice border which is “sharp” and rather firm.
And now that I am actually feeling much better again, I am very looking forward to start with the next step of my keyhole neckline tomorrow. It will involve a lot of measuring, pinning, cutting and even more measuring and re-pinning… Yes, a proper keyhole neckline definitely needs a lot of work and love! 😉


You must be logged in to post a comment.