
 And today – last but not least – I will show you the final progress pictures of the pearl embroidery for my 12th century belt project! 🙂
Even though I was tremendously looking forward to finishing this quite important embellishment step for my project, I couldn’t help the feeling of a certain amount of sadness as soon as I attached the last pearls to the surface of my new 12th century belt.
Well, pearl embroidery per se is definitely very satisfying and also a little bit addictive because it enables very beautiful enrichment of nearly every embroidery project in a rather short time. Furthermore it is also a very nice feeling when a project doesn’t take forever until some good progress can be achieved… 😉
…and talking about pearl embroidery progress – I think you will like the last progress pictures of my pearl embroidery for my 12th century belt project – enjoy! 😀
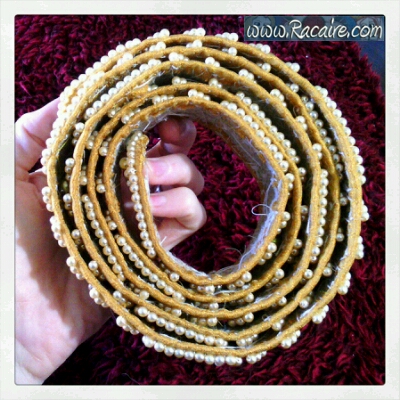
To give you a better idea of the length of my new 12th century belt project, I took a picture of the complete belt rolled up for you. Yeah, that’s how 160cm (ca. 63inches) look like when they are rolled up! …and no, please don’t worry – I didn’t double my waist line during the last weeks. This belt is supposed to go about twice around my waist line. 😀
And here a picture of this ca. 160cm / 63inches long 12th century belt wrapped around my arm to give you a better idea of the amount of pearl embroidery I added to the whole belt:

YAY for a good collection of pearls and my collecting habit at this point! I knew I could use them sooner or later! But before you ask me about the amount of pearls involved in this project – well, I used plenty to fill the complete belt and far too many to even think about counting them! 😉
And now let’s take a closer look at the final pearl embroidery which I added to the belt:[emember_protected not_for=3-4 do_not_show_restricted_msg=1]
…I am sorry, but this content is restricted to users with Advanced and Premium membership.

As you can see on the pictures above, I did not only fill the empty spaces between the bezants – I also added more pearls to the triangular part at the end and the beginning of the belt.
I had the choice between a quite simple filling and one that would stand out a little bit more. Though a plain and quite basic filling – one with only small pearls – would have also looked quite lovely, I soon realized that the look didn’t really satisfy me. Therefore I decided to go with the latter option of embellishment.
In order to add a certain blink which didn’t distract too much from the rest of the pearl embroidery but would loosen up the overall design a little bit, I chose to add some bigger colored pearls in the corners. This colored and quite big pearls seemed to add a very nice effect because they looked like mounted gems at the first glimpse. And they also work very nice as eye-catchers among the otherwise rather simple and plain looking faux pearls.
Then I decided to fill the rest of the free space with more of my small white pearls. It is not easy to fill a space with pearls perfectly due to the quite firm and unforgiving medium but I did my best to place them as well as possible to fill the remaining space:

After adding the colored big pearls at the beginning and end of the belt, I decided to also add them in the first and last section:
…as well as in the left and right section next to the bezant situated in the middle of my belt:

This extra pearls, which are now marking the middle of the belt, not only add another nice eye-catcher to the middle of the belt and my front waist line, they also make it much easier for me to determine the middle of the belt when I put the belt on.
And here a closer look at this “special” pearls:

To make sure that the pearls are firmly secured in place, I again used a double thread and went two times through every single pearl:

I also used a double thread for the surrounding pearls – couching down the double thread which is holding the pearls after every single pearl.
And finally – for the remaining sections between the other bezants – I decided to go with a slightly more basic design:

To go for a less elaborate embellishment and design in this sections is based on a quite simple reason. Big pearls in this areas – especially at the back or side parts, where the belt parts cross – would just add an annoying nuisance rather than being a true embellishment.
And here a closer look at one of this sections for you:

As you can see at the picture underneath, I first added two pearls parallel to the border of the belt and then added a pearl underneath and above. This creates a pearl embroidery of four pearls arranged in a slight diamond pattern:

And here again a picture of the pearls from the side:

I hope you enjoyed the pictures of my finished pearl embroidery for my very first 12th century belt. Now I have to determine what kind of string I want to create to be able to wear it but this is the topic of another posting… 😉


You must be logged in to post a comment.