
 It’s time again for some embroidery. The focus of todays posting will be on some red silk embroidery and a tiny embroidered pelican.
I hope you are just as excited as I am. Today I am going to show you the technique which I used to embroider the red embellishment along the border of the middle part of the roses. And that’s not all – I also have a sneak peek at the little, very cute pelican which I added to the middle of one of the roses. 😀
Well, my friend Elisenda is a “rose” and a “pelican” in the Society for creative Anachronism (short: SCA). And though she asked me to create a hood which displays that she is a “rose” (a former queen of the great Kingdom of Meridies, where I live now), I thought that I might also sneak in a small pelican, to also show this very cherished rank within the SCA.
Well, I was already working on the very first rose when I made this decision and suddenly had the idea that I might add a tiny pelican to the middle of one of the roses. So far so good – the idea was born and I really wanted to try it. Therefore I took some silk thread and started with the outlines of the pelicans. And though I really love the outcome, this is definitely the very last pelican executed in round surface couching within a space that is just a little bit bigger than a dime. Ok, let’s say that it is the last one for at least some time or until I fully recovered from trying to work with so many threads in such a tiny space… *lol* 😉
Nevertheless, it was a lot of fun. It was equally demanding and interesting as I have never done something similar before. Well, I used raised surface couching – or “raised gold embroidery” – on a very small scale before as well as couching thread in a different color to create special overall surface patterns but I have never created a specific picture – like this pelican – on top of my surface couching embroidery. And that I worked the surface couching in a round shape just made the whole thing a little bit more difficult… But well, it’s definitely something I might explore again for a different project in the future… 🙂
But enough small talk, let’s take a look at the tiny pelican embroidery and the red silk embellishment around the middle section of the roses for my friends 14th century hood – enjoy! 😀

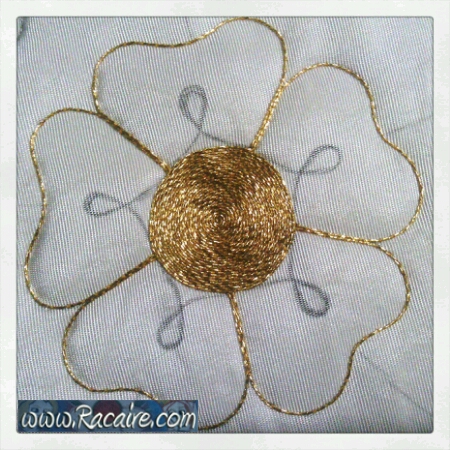
In my last posting – “More about the rose embroidery for my friends hood .3 – my surface couching embroidery for the center of the roses…” – I showed you how I created a “simple” round shaped goldwork embroidery for the middle of the roses by using the surface couching technique. Btw. you can find and download my handout for this technique on my “Medieval Embroidery Technique Handouts” page. And today we get to the tiny pelican embroidery which I added on top of the surface couching / goldwork for the middle of the first rose. Adding a “picture” or embroidery on top of goldwork / surface couching is actually not as difficult as it sounds and you can consider it the next difficulty level for this kind of embroidery.
In order to add the pelican on top, I simply sketch the outlines for it directly on the silk fabric, as you can see on the picture above and underneath. For this purpose I used a simple pencil (with not too soft lead) as all the outlines would get covered up with embroidery during the surface couching process.
Then I threaded another very thin needle with slightly thicker silk thread then the yellow silk I normally use for couching and secured it to the back. This decision to use this silk thread was based on some simple facts – I wanted to embroider the pelican with a blue silk thread which matches the wool fabric of the hood and I only have a very limited range of colors when it comes to very thin silk threads. Furthermore the slightly thicker thread allows me to use less stitches for the outlines as the thread covers more of the gold thread. Yes, as you can see, this decision was actually a rather easy one… 🙂
And from this point on it’s just like “painting with numbers” – as I love to call all the techniques where I have to follow simple outlines or instructions – as you just need to add some surface couching stitches with the colored thread along the pencil outlines you made before:
 But as easy as it was for me to add extra surface couching stitches in this round shape to create a tiny pelican embroidery, please don’t forget that I have a lot of practice in working surface couching embroidery. If you don’t have that much experience with this technique and would like to try it out – please do it! I just recommend to start with vertical or horizontal lines of surface couching which make it so much easier to create a pattern or a picture on top of the gold thread.
You can find a much bigger and more elaborate version of this kind of embroidery on Petronilla’s blog: “ELISHEVA’S KITCHEN – A pouch in Or Nué technique”
If you would like to find more helpful and/or interesting links to surface couching or gold work, please visit my page “Medieval Embroidery Techniques”
…and now back to my tiny pelican – having to concentrate on not getting my silk threads tangled up too much on the back side – at one point I also added a red silk thread for a part on his chest – as well as getting the outlines right, I completely forgot to take more pictures of my embroidery after this point. However, I can really assure you that it is not very difficult if you give yourself a little bit more space and straight lines – just focus on keeping the threads with which you are not working out of your way and follow your own outlines. And than it is just important how proper you work your lines and your filling. It is actually not a matter of covering the whole gold thread with silk as even the medieval examples we normally strive for let a little bit of gold blink through from time to time which gives “Or Nue“, like Petronilla’s embroidery which I linked above, its great appeal.
And now to the red silk embellishment along the border of the circle in the middle:
As before for the pelican embroidery, I used a simple pencil to sketch the outlines for the border embellishment. Furthermore I decided to use a raised/padded Satin Stitch for this part of the rose – underneath you can already see some parts that are finished and the work at the last “blood drop” shaped section:

On the picture above you can see how I work the border of the section with a very simple Stem Stitch and then – as you can see on the picture underneath – I simply filled the middle section with more stitches.

This way you can add a little more “body” to your Satin Stitch which lets the embroidery stitches added on top later appear more full and round. Furthermore this added padding will ensure that non of the white silk fabric will show through at any time.
After all the padding was in place, I worked the Satin Stitches very tightly over the padding:

…and more stitches:

…until the complete section is covered up with Satin Stitches:

Btw. I worked the sections along the border of the middle with less padding but with a similar amount of Satin Stitches on top, if not more – just to cover up as much of the white silk fabric as possible.
And here a picture of the finished pelican in the middle and the red silk embellishment along the border:

As you can see on the picture above, the red silk embellishment looks a little bit disconnected. But this can be easily fixed with adding just a little bit more gold thread in surface couching along its outer borders:

And then I added a second line of gold thread to the outside of the inner rose petals. Underneath you can see a close up picture of the pelican, the finished red silk embellishment with gold thread along the border and more surface couching in progress:

And more surface couching along the outlines of the outer rose petals:

And again a close up picture of the surface couching. As you can see it is really not that difficult – just one little stitch after another:

[emember_protected not_for=3-4 do_not_show_restricted_msg=1]
…I am sorry, but this content is restricted to users with Advanced and Premium membership.
I hope you enjoyed todays posting about how I embroidered the little tiny pelican and the technique I used for the red embellishment along the middle part of the roses. And there are still some more pictures about this project which I will show you in my next posting. 🙂


You must be logged in to post a comment.